
Tuesday, September 7, 2010
Fabric Blocks for Baby

Saturday, September 4, 2010
Lamb Pillow....I did it!
Because I'm
lazy normally pressed for time and very efficient, I traced once with the vanishing fabric pen, folded, and cut through two pieces of felt at the same time to get the two face sections. This technique worked well for the ears and leg pieces as well. I know, I know, my sewing is cringe-worthy. But I'm working on it. Check me in 6 months. I'll be a sewing fool with crazy clean lines.
One thing I didn't pay attention to is making sure my bottom and top thread matched. I forgot that the thread would show on both sides of the lamb. So my lamb has white thread on one side and brown thread on the other. Oopsies. I broke the crap out of my needle. These are the kinds of things that make a 1 hour job take 2 hours. Now I must take time to go read the manual and figure out how to change the needle. Luckily that was an easy thing to do.
Pieces are all pinned together and ready for stitching, stuffing and finishing off the opening.
I think he turned out really cute. I could have made him fluffier with the stuffing. And next time I might make a larger momma sheep.
Now I'm off to remove something from my To-Do list. I love that.
Stay pretty!
Friday, August 13, 2010
Baby's Room - Wall Decor

Of course, if you do this you need to make sure you hang them high enough on the wall that even on baby's best day she could never pull them off and choke on any of the pieces her curious little hands might dig off. You probably already knew that but I wouldn't be any kind of mother if I didn't say it.
Saturday, August 7, 2010
Decorate a plain onsie with a felt flower.
I cut the flower out of pink felt (and a matching piece of Heat N Bond) using my Cuttlebug and a flower Nestabilities die. I ironed the Heat N Bond onto the back of the flower and then the flower onto the onsie. I used embroidery floss to secure the button and to do the hand stitching. And BAM! You have just prettied up a plain boring onsie.
Friday, July 30, 2010
Tuesday, July 13, 2010
Baby Bootie Bouquet
Diaper Cake
This is the only one I've made. They take a bit of time and a crap ton of rubber bands, but once you get going it is pretty easy even for a first timer. I did cheat a little by using a huge bottle of baby wash in the center (meaning I had fewer diapers to roll & secure.)
I used larger sized diapers (size 2 & 3) since I figured the gal would get plenty of the smaller sizes from other guests.
Tuesday, July 6, 2010
Custom Baby-Safe Magnets
I have been looking for magnetic toys for the baby. She creeps and crawls now so when we are cooking and cleaning, she likes to hang out in the kitchen and play with the fridge magnets. The only magnets we feel comfy having her play with are the big rubbery ones that spell out city names that you get while waiting in an airport during a layover on your way home from vacation and feel like you just haven't quite spent enough money. Yeah, you know the kind.
"Why not get those alphabet letters" you ask? I've looked into those already. No go. They are 1) made in China (blech!) 2) have tiny and, I'm quite sure, poorly adhered magnets on the back, and 3) not intended for babies anyway.
So strolling through Target today I found this $5 puzzle.
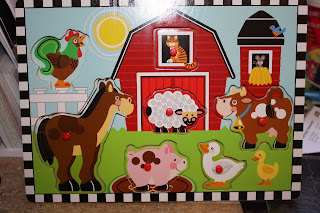
I also remember that I have 8.5x11 self-adhesive magnet sheets at home left over from another project. You are already doing the math.
I will cut the magnetic sheet using Spellbinder's dies, stick it to the back of each animal and vwah-lah! Instant (and safe) baby toy.
Okay, as I was typing this up I heard some clanking sounds in the kitchen. Apparently the puzzle pieces are made up of some type of balsa wood = not great for sticky back magnet sheets. I am going to glue the magnet sheet on with some fabri-tac glue or glossy accents. I'll report back if this works.
***UPDATED***
The extra glue worked! Yay!


