Showing posts with label Cricut Expression. Show all posts

Sunday, September 12, 2010

Card using "Just Because Cards"


Okay so I'm super excited to tell you about this card. I used a feature on my Gypsy that I JUST learned about and I'm gonna bust. Jerry, I'm bustin! The feature turns off certain cuts in an image. That's right...you heard me. You can actually make the machine ignore certain things that it would normally cut. It's on the 'advanced' tab and the icon looks like 2 right angles.

From the Just Because Cards cartridge, I put the "Bee Happy" stencil image on my mat. If you aren't familiar with this image, it is an oval with the words "bee happy" cut out of the center. I also put the phrase "happy" from the same cartridge on my mat. Sized both to the dimensions I wanted.

I didn't want the card to say "bee happy" but I still wanted to use the oval, so I turned off the bee happy cuts. Then I moved the word "happy" onto the oval and centered it, then welded it. The result is what you see on the card.

To grasp how fabulous this feature is, let me tell you a little story. I needed to cut out about 25 baby dresses. The only cartridge I had at the time would cut out a dress but also had bloomers that I didn't need. So, to not waste paper, I had to sit with the machine while it cut the dress and then press the cancel button before it started cutting the bloomers. Yep, x25. How tedious! The whole point of having an automated machine is so you DON'T have to babysit it, right? So you can see how the 'uncut' feature would have saved me a ton of time.

Maybe I'm the last person to learn how to use this feature...I mean I don't even know what it's called, but do you realize how many more options you now have? It jacks up the number of things you can make by like a bazillion percent. Okay raise your hand if you want to marry your Gypsy. Am I the only one?

Stay pretty!

Friday, September 3, 2010

Sunshine Applique and a sewing machine that hates me.

Making an applique seems like it should be the easiest thing in the world. But for me, nothing is easy. Especially when my idiot sewing machine is involved.

I confess that I have recently learned how to say "applique" correctly. My mom and sister about died laughing when they heard me pronoune it "app-leek". In my defense, it is spelled like critique! Stop laughing. It's not like the average person has occasion to use that word much anyway.

"Hey Bob. How was your weekend?"
"Great, Sam. I was up to my neck in appli-KAYS. It was awesome."
"Man, don't I believe it!"

See...you just don't hear that around the office much.

1) Prepare the fabric. I ironed Heat N Bond onto the back of the fabric I would be using to make my appliKAY. I've learned that HnB works better at all if you let it cool completely before you take off the paper backing.

2) Next I cut a cardstock sunshine using my Cricut machine. This is what I will use to trace the pattern onto the fabric.

3) Trace the sunshine onto the back of the fabric and cut out.

4) Then I used a circle Spellbinder die run through my Cuttlebug machine on the orange fabric to cut out the center of the sunshine. Yes, I know people should be able to free-hand a circle but I use my dies as much as I can. When I figured out they could easily cut fabric, I was like "YIPPEEEEEEEEEEEE!" Why have a shakey wobbly hand-cut flat-tire-looking circle when I can have a perfectly round one in a matter of seconds?

5) Next I ironed the sunshine and it's center onto the outside of the onesie and some fusible interfacing onto the inside of the onsie. The interfacing makes fabric more sturdy for when I stitch around the shapes.

6) Finally I get to sew stuff. You might be wondering why I need to sew the sunshine even though I just ironed it onto the onesie. Well, I want to throw in some hot pink and I want it to look more finished. Plus, I think stitching around the edges helps prevent fraying or something like that.

So here is where my nightmare began. I'm happily sewing but realize the tension is set wrong because the white bobbin thread is showing. I pick out the thread. *Adjust tension* Start over.


Something is still wrong. Pick out more thread. *Adjust tension the other way* Start over. Yes, something is still wrong because at certain points the needle just won't come back out of the fabric like it is stuck on something. I check the underside of the garment. The freaking bobbin is all knotted up! What gives?

Apparently the tension was only half the problem. I was using embroidery thread and the spool didn't fit properly on the spool holder thingy so the thread was jerking and pulling around as the needle went up and down. Dang it! FINE. I'll pick out the thread AGAIN and use a different spool and a different section of the design. I am NO quitter.

*Happily sewing sewing sewing.*


Things seem to be going great. Until I flip the onesie over to check on the bobbin thread and see THIS. Gaah! *Bleeeeeeeep*


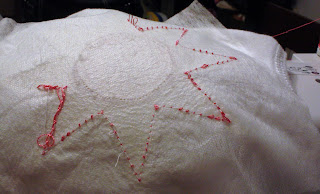
I gasp in horror at the idea of picking out the thread one more time. And I can feel the sewing machine mocking me. It's like it knows I'm about to lose it. Yet I carry on. Clipping away another failure but determined to finish what I started.

*more fiddling with the tension settings*

Well, finally I get the tension right and finish the project. Do you smell that? I believe it's called V-I-C-T-O-R-Y.


I can't quite say whether it was worth it or not. This project should not have taken so long. But I did come out having learned some things about my sewing machine. And I do love prettifying my daughter's clothing, but when I walk through Target and see adorable clothing with elaborately stitched designs that I can buy for $7.00, yeah it kinda makes me wonder why I do this.

Yet on I go. I am NO quitter.

Until next time, stay pretty.

Friday, July 30, 2010

Baby's 1st Birthday Banner


This is not my original idea, but it was FUN to sort through pictures to make.

Cutting Fabric with Cricut Expression: The Joys of Heat-n-Bond

I've been wanting to use my cricut machine to cut fabric for a long time. Wouldn't sewing be so much easier if you could skip the pattern tracing/cutting step? I knew you would agree.

First Attempt:
I grabbed a square of pre-washed fabric, stuck it to the mat and set the machine to cut. No go. The fabric came loose from the mat in certain places and ended up being a partially cut but mostly balled up mess.

Second Attempt:
Based on a youtube video tutorial, I learned that applying Heat-n-Bond to your fabric will make it less give-y and help it adhere to your sticky cutting mat better. I ironed thie HnB to the fabric and used a new mat and new blade with the speed set to low and blade depth set @ 6. I didn't even remember to change the pressure, so I have no idea what setting it was on.

I set the cricut to cut two 6 inch tall numbers: 1 & 7. The fabric cut out wonderfully with nice clean edges! The Heat-n-Bond seemed to do the trick. JOY!

Third Attempt:
Having a successful cut under my belt, I thought I'd cut out the reverse sides of 1 & 7 for the bean bags I want to make for Brooklyn.

FAIL! The letters didn't stick and the result was very similar to the first trial run. I guess I ironed the HnB for too long because the surface didn't feel smooth like it did on the 2nd trial run. It was more scratchy and I could see the adhesive left behind on the paper layer as I peeled it away. Can you scorch HnB?

Fourth Attempt:
I tried ironing more HnB to new fabric. I didn't even get to the cutting part this time. I cannot get the HnB to go on any more smoothly. What the heck am I doing wrong? Re-reading the directions "iron for 2 seconds." Okay, that's what I'm doing!

Fifth Attempt:
Okay, at this point I'm about to have a little mini tantrum. I hate wasting supplies! And apparently I'm no match for the cricut machine if the Heat-n-Bond is kicking my butt. However, not wanting to be someone who gives up so easily, I try to iron the HnB onto a tiny scrap of material, leaving the iron on for a nano-second. After it cools and I peel off the paper I see the HnB is bonded beautifully.

Should I try to cut one more time? I know that if it gets honked up in the cricut machine again I will start to throw stuff, so I decided to save that perfectly bonded little square of fabric for another day.

It may never go through the cricut machine. It may turn into an iron-on that will spruce up baby's onsie. Of course I will post pics of whatever I do with it. Stay tuned. =)