Friday, July 30, 2010

Baby's 1st Birthday Banner


This is not my original idea, but it was FUN to sort through pictures to make.

Cutting Fabric with Cricut Expression: The Joys of Heat-n-Bond

I've been wanting to use my cricut machine to cut fabric for a long time. Wouldn't sewing be so much easier if you could skip the pattern tracing/cutting step? I knew you would agree.

First Attempt:
I grabbed a square of pre-washed fabric, stuck it to the mat and set the machine to cut. No go. The fabric came loose from the mat in certain places and ended up being a partially cut but mostly balled up mess.

Second Attempt:
Based on a youtube video tutorial, I learned that applying Heat-n-Bond to your fabric will make it less give-y and help it adhere to your sticky cutting mat better. I ironed thie HnB to the fabric and used a new mat and new blade with the speed set to low and blade depth set @ 6. I didn't even remember to change the pressure, so I have no idea what setting it was on.

I set the cricut to cut two 6 inch tall numbers: 1 & 7. The fabric cut out wonderfully with nice clean edges! The Heat-n-Bond seemed to do the trick. JOY!

Third Attempt:
Having a successful cut under my belt, I thought I'd cut out the reverse sides of 1 & 7 for the bean bags I want to make for Brooklyn.

FAIL! The letters didn't stick and the result was very similar to the first trial run. I guess I ironed the HnB for too long because the surface didn't feel smooth like it did on the 2nd trial run. It was more scratchy and I could see the adhesive left behind on the paper layer as I peeled it away. Can you scorch HnB?

Fourth Attempt:
I tried ironing more HnB to new fabric. I didn't even get to the cutting part this time. I cannot get the HnB to go on any more smoothly. What the heck am I doing wrong? Re-reading the directions "iron for 2 seconds." Okay, that's what I'm doing!

Fifth Attempt:
Okay, at this point I'm about to have a little mini tantrum. I hate wasting supplies! And apparently I'm no match for the cricut machine if the Heat-n-Bond is kicking my butt. However, not wanting to be someone who gives up so easily, I try to iron the HnB onto a tiny scrap of material, leaving the iron on for a nano-second. After it cools and I peel off the paper I see the HnB is bonded beautifully.

Should I try to cut one more time? I know that if it gets honked up in the cricut machine again I will start to throw stuff, so I decided to save that perfectly bonded little square of fabric for another day.

It may never go through the cricut machine. It may turn into an iron-on that will spruce up baby's onsie. Of course I will post pics of whatever I do with it. Stay tuned. =)

Tuesday, July 13, 2010

Baby Bootie Bouquet

I saw this in a book and thought it looked easy enough. It was. You just buy a pack of baby socks and roll them starting with the toe, then fold the cuff up a little bit. This secures the rose bud look and gives you something to put over the craft stick that will serve as the stem. A cinch.

Diaper Cake

Okay, so not everyone knows what a diaper cake is. I know this because I told a friend I was bringing one to a baby shower and she innocently asked "How many does it feed?"

This is the only one I've made. They take a bit of time and a crap ton of rubber bands, but once you get going it is pretty easy even for a first timer. I did cheat a little by using a huge bottle of baby wash in the center (meaning I had fewer diapers to roll & secure.)

I used larger sized diapers (size 2 & 3) since I figured the gal would get plenty of the smaller sizes from other guests.


Quick Hostess Gift

I made these last year for my sister since she hosted our family Christmas breakfast. The mop-n-glow technique couldn't possibly be easier and the results are quite stunning.

1. You pour a bit of the mop liquid into the bulb.
2. Cover opening of bulb with saran wrap (to prevent any spills - floor wax is STICKY!)
3. Shake bulb around so that the floor wax completely coats the inside surface of the bulb.
4. Pour out any excess liquid.
5. Pour glitter into bulb.
6. Cover opening with saran wrap again.
7. Shake bulb so that glitter is now covering all of the inside surface of the bulb.
8. Using ribbon of choice, make a bow for hanging bulb in tree.

Tuesday, July 6, 2010

Custom Baby-Safe Magnets

Okay, so you know how when you have a great idea you are like "Oh. My. Goodness. I am such a genius!!! I must share my genius with THE WORLD!!!!!"? Well today is that day for me.


I have been looking for magnetic toys for the baby. She creeps and crawls now so when we are cooking and cleaning, she likes to hang out in the kitchen and play with the fridge magnets. The only magnets we feel comfy having her play with are the big rubbery ones that spell out city names that you get while waiting in an airport during a layover on your way home from vacation and feel like you just haven't quite spent enough money. Yeah, you know the kind.


"Why not get those alphabet letters" you ask? I've looked into those already. No go. They are 1) made in China (blech!) 2) have tiny and, I'm quite sure, poorly adhered magnets on the back, and 3) not intended for babies anyway.

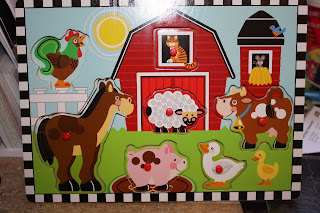
So strolling through Target today I found this $5 puzzle.


I also remember that I have 8.5x11 self-adhesive magnet sheets at home left over from another project. You are already doing the math.


I will cut the magnetic sheet using Spellbinder's dies, stick it to the back of each animal and vwah-lah! Instant (and safe) baby toy.


***UPDATED***

Okay, as I was typing this up I heard some clanking sounds in the kitchen. Apparently the puzzle pieces are made up of some type of balsa wood = not great for sticky back magnet sheets. I am going to glue the magnet sheet on with some fabri-tac glue or glossy accents. I'll report back if this works.

***UPDATED***
The extra glue worked! Yay!